用 hover 取代 click 來開啟選單並不是一個好設計
常常接到設計師或是 PM 提出這樣的需求,用 hover 來取代 click 來觸發開啟選單或者切換 tab,這樣設計的除了可以告知使用者這邊有隱藏的內容選單,使用者也可減少一個點擊的動作來達到開啟選單的目的。
但這樣的設計會產生兩個讓使用者感到困擾的問題:
- 移動滑鼠或捲動頁面時因為滑鼠動線導致選單非出於意願的自動開啟,遮蓋使用者關注的內容
- 滑鼠移動至選單或觸發內容時因為滑鼠動線移出 hover 區域造成選單收起
效果如下
如果是用 hover 來做 tab 切換也會有類似的問題,效果如下
解決方法很簡單,解釋這樣的問題給 PM 跟設計師聽,請設計師跟 PM 把 hover 改成 click 的作法即可。
但有的時候因為一些理由,像是「是因為 XXX 用 hover,所以我們也要這樣做」前端工程師就必須抓破腦袋試著去兼顧 hover 需求跟使用者體驗來進行 work around,而幸好在歷史的洪流之中,你我都不是第一個遇到這樣令工程師跟使用者困擾的設計,AWS 裡頭的複合式選單 MegaMenu 就有針對這樣的行為做的 work around,滑鼠移動到選單內容的過程並不會使選單跳走,效果如下
how to work around #
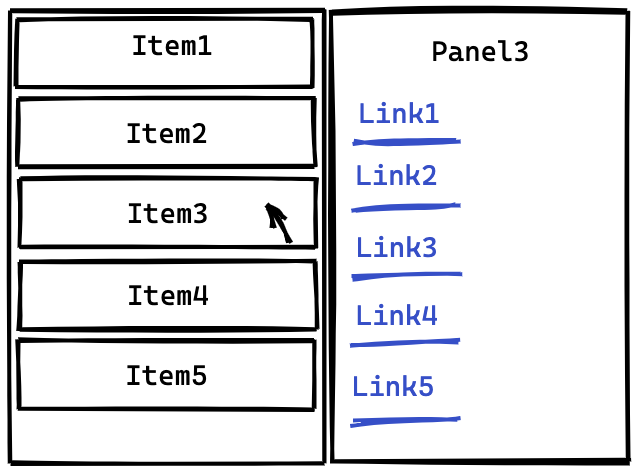
以多層複合式選單為例,圖中 Item 3 上的滑鼠移動到 Link 的動線上有機會 hover 到 Item 2 跟 Item 4 就會導致 Panel 的跳走

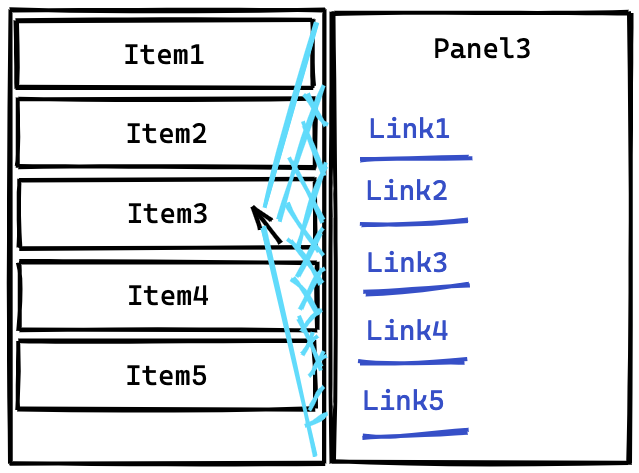
常見的處理手法有兩種,第一種參考 Breaking down Amazon’s mega dropdown 文章的做法,把滑鼠跟 Menu 右上角跟右下角連成一塊藍色三角形區域

若使用者將滑鼠移動到右側藍色三角形區域,就視為使用者想移動到選單上,則不做選單的切換,藍色三角形區域的偵測則是利用滑鼠前後移動位置與 Menu 右上角跟右下角計算向量斜率來判定,這樣的做法優點是滑鼠在垂直方向的響應速度比較快,缺點是滑鼠方向的控制要精準才有效,而且一旦不小心誤觸就會開啟選單。
用 React 實作如下:
const Menu = () => {
  const [activePanelNum, setActivePanel] = useState(null);
  const candidatePanelRef = useRef(null);
  const menuRef = useRef(null);
  const menuPosRef = useRef(null);
  const prevSlopeRef = useRef(null);
  useEffect(() => {
    const posX = menuRef.current.offsetLeft + menuRef.current.offsetWidth;
    menuPosRef.current = {
      rightTop: [posX, menuRef.current.offsetTop],
      rightBottom: [
        posX,
        menuRef.current.offsetTop + menuRef.current.offsetHeight,
      ],
    };
  });
  return (
    <div
      onMouseLeave={() => {
        prevSlopeRef.current = null;
        setActivePanel(null);
      }}
      className={"wrapper"}
    >
      <ul
        className={"menu"}
        ref={menuRef}
        onMouseMove={(e) => {
          const { clientX, clientY } = e;
          const { rightTop, rightBottom } = menuPosRef.current;
          const slopeRightTop =
            (clientY - rightTop[1]) / (rightTop[0] - clientX);
          const slopeRightBottom =
            (clientY - rightBottom[1]) / (rightBottom[0] - clientX);
          if (
            !prevSlopeRef.current ||
            ((slopeRightTop < prevSlopeRef.current.slopeRightTop ||
              slopeRightBottom > prevSlopeRef.current.slopeRightBottom) &&
              candidatePanelRef.current !== activePanelNum)
          ) {
            setActivePanel(candidatePanelRef.current);
          }
          prevSlopeRef.current = {
            slopeRightTop,
            slopeRightBottom,
          };
        }}
      >
        {Array.from({ length: 10 }).map((item, i) => (
          <li
            className={"menuItem"}
            key={i}
            onMouseEnter={() => {
              candidatePanelRef.current = i;
            }}
          >
            {"Item " + i}
          </li>
        ))}
      </ul>
      {activePanelNum !== null && <Panel activePanelNum={activePanelNum} />}
    </div>
  );
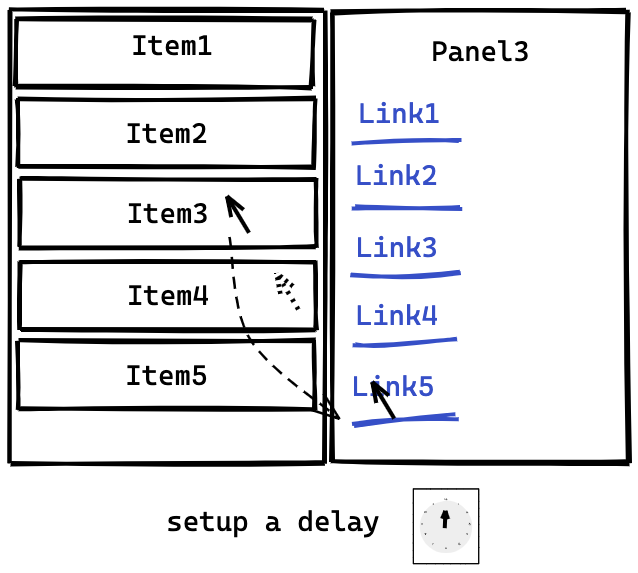
};另一種作法是滑鼠進入 hover 區域不會馬上觸發選單,而是 delay 一小段時間後再進行觸發,優點是實作簡單,滑鼠只要不要懸停過久都不會觸發選單開啟,但缺點就是 delay 時間的數值難以決定,太少選單會太敏感,太多又會被抱怨選單響應時間過慢。

用 React 實作如下:
const Menu = () => {
  const [activePanelNum, setActivePanel] = useState(null);
  const candidatePanelRef = useRef(null);
  const timoutRef = useRef(null);
  const removeTimout = () => {
    if (timoutRef.current) {
      clearTimeout(timoutRef.current);
      timoutRef.current = null;
    }
  };
  useEffect(() => () => removeTimout(), []);
  return (
    <div
      onMouseLeave={() => {
        setActivePanel(null);
      }}
      className={"wrapper"}
    >
      <ul className={"menu"}>
        {Array.from({ length: 10 }).map((item, i) => (
          <li
            className={"menuItem"}
            key={i}
            onMouseLeave={removeTimout}
            onMouseEnter={() => {
              removeTimout();
              timoutRef.current = setTimeout(() => {
                setActivePanel(candidatePanelRef.current);
                timoutRef.current = null;
              }, 300);
              candidatePanelRef.current = i;
            }}
          >
            {"Item " + i}
          </li>
        ))}
      </ul>
      {activePanelNum !== null && <Panel activePanelNum={activePanelNum} />}
    </div>
  );
};最後考慮選單響應速度在瀏覽時也許不是那麼的重要,並利用 css :hover 調整背景色來提升使用者對 hover 響應速度,最後我在 Yahoo 購物中心 選擇第二種做法,效果如下
結語 #
不管怎麼的 work around 作法,都是一種權衡取捨,並不盡善盡美,又相當花開發時間,另外手機平板裝置的使用者無法使用滑鼠,還是要透過 click 來完成選單的開啟,hover 的互動對這些觸控裝置的使用者就沒有意義,也許回歸需求的源頭,用 hover 取代 click 來開啟選單並不是一個好設計。如果這篇文章沒有辦法幫你擋住需求,那希望提供的 work around 可以幫助到你。
Ref #
https://bjk5.com/post/44698559168/breaking-down-amazons-mega-dropdown


